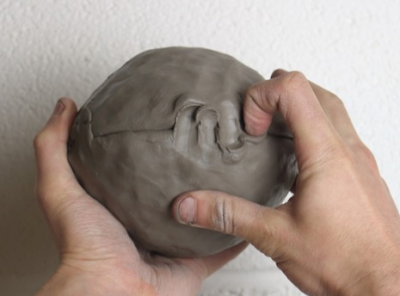
How to make a combined pinch pot
You Must :
Bring one and or donate a box of" Zipper Gallen Storage Bag" or take a used one
Four Classes of Wet Clay
1st class: Combined pinch pot
2nd class: Shape the form, then cut open - cover: flange/ rim
3rd class: Building additions
4thClass: Carving subtraction/texture then smooh
Canvas and water spread bottles
Clay Cart and Clay Sitting Board
Greenware
Clay Cart and Clay Sitting Board
Tools on the demonstration table
Student's tools
Craft Sticks
Modeling Tools
Pin Tools
Carving tools
Google Doc.- Sketch Example
The rubric of making Form and Function pinch pot
1. Be creative with form and function to express a Topic/Big idea and Purpose
2. Combine two pinch pots
3. Use the addition process to add clay to basic form- sculptural elements, handles, etc…
4. Cut out apart/ cut them apart
5. Use the subtraction process- carve out holes, draw on clay, relieve carve, carve to shape, and add texture.
6. What is good craftsmanship?
Wedging clay
Steps of a single pinch pot
1. Form a ball of clay
2. Open
3. Pinch in to make the bottom
4. Pinch and Rotate.
Pinch
Pinch more
Until done
Double Pinch Pot Joining Technique
1. Score around the rims of each pinch pot with a pin tool. You can crisscross the score marks .
2. Apply slip
Slip: A mixture of clay and water used to join scored pieces of clay.
3. Place the pinch pots together. This is the most crucial part of the making process! Push one rim into the other by digging your finger in just a little and pushing over to the other side. Repeat all the way around the join. It doesn’t need to look neat!
4. Shaping
Once joined you can gently hit the pot with a stick all over to compress and reinforce the join. Get it into a round shape and knock out the join and pinch marks, patching up any holes using the above technique.
5. Shape the piece to your desired shape. Air hardening clay may not get much taller, but you can use modeling tools to create a smooth surface and define the shape by smoothing up and down.
The structure of the combined pinch pots
From top and bottom
From side to side
From the middle
One combined with 2 pinch pots and one extra pinch pot
Base for better structure


