Portfolio Extention: March 6th, Friday
Sign out sheet
Take one Hall Pass with you
Click on the photo- Format options- Adjustments - brightness, and contrast
Form and Function
Assignment: Form and Function Worksheets
Intro of Pinch Pot- Combined Pinch pots
Intro of Pinch Pot- Combined Pinch pots
Pinch or thumb pots are one of the oldest forms of art, dating back to about 12,000 years. They are as contemporary as they are ancient. When you begin your first piece in this method, as many other ceramic students do around the world, you are participating in an activity that has captivated creators for thousands of years. A well-formed pinch pot has a simplistic beauty all its own, or it can become a base for ceramic forms as complex as you can imagine. Welcome to the world of clay!
What is a pinch pot?
Simple clay vessels such as bowls and cups of various sizes can be formed and shaped by hand using a methodical pinching process in which the clay walls are thinned by pinching them with thumb and forefinger. ... Thumbs are pushed into the center, and then rudimentary walls are created by pinching and turning the pot.
Steps of a single pinch pot
1. Form a ball of clay
2. Open
3. Pinch in to make the bottom
4. Pinch and Rotate.
Pinch
Pinch more
Until done
Double Pinch Pot Joining Technique
1. Score around the rims of each pinch pot with a knife. You can crisscross the score marks and add slurry or water to help the clay stick.
2. Slip: A mixture of clay and water used to join scored pieces of clay.
Apply slip
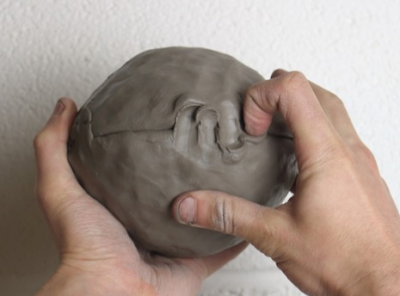
3. Place the pinch pots together. This is the most crucial part of the making process! Push one rim into the other by digging your finger in just a little and pushing over to the other side. Repeat all the way around the join. It doesn’t need to look neat!
4. Shaping
Once joined you can gently hit the pot with a stick all over to compress and reinforce the join. Get it into a round shape and knock out the join and pinch marks, patching up any holes using the above technique.
5. Shape the piece to your desired shape. Air hardening clay may not get much taller, but you can use modeling tools to create a smooth surface and define the shape by smoothing up and down.
How do artists & designers determine goals for designing a sculpture?
The rubric of Functional Pinch pot sculpture:
1. Be creative with form and function to express a Topic/Big idea and Purpose:
2. Combine two pinch pots
3. Use the addition process to add clay to basic form- sculptural elements, handles, etc…
4. Cut out apart/ cut them apart
5. Use subtraction process- carve out holes, draw on clay, relief carve, carve to shape, add texture.
6. What is good craftsmanship?
Nothing jagged or it will be sharp. Edges are smoothly refined. The form is carefully planned. Walls are even thickness. Joining is secure and hidden. All surface is smooth without carless burns and scars. The final pinch pot sculpture is built with standing balance without wobbles.
Nothing jagged or it will be sharp. Edges are smoothly refined. The form is carefully planned. Walls are even thickness. Joining is secure and hidden. All surface is smooth without carless burns and scars. The final pinch pot sculpture is built with standing balance without wobbles.
The rubric of making Form and Function pinch pot
1. Be creative with form and function to express a Topic/Big idea and Purpose
2. Combine two pinch pots
3. Use the addition process to add clay to basic form- sculptural elements, handles, etc…
4. Cut out apart/ cut them apart
5. Use subtraction process- carve out holes, draw on clay, relief carve, carve to shape, add texture.
6. What is good craftsmanship?


